

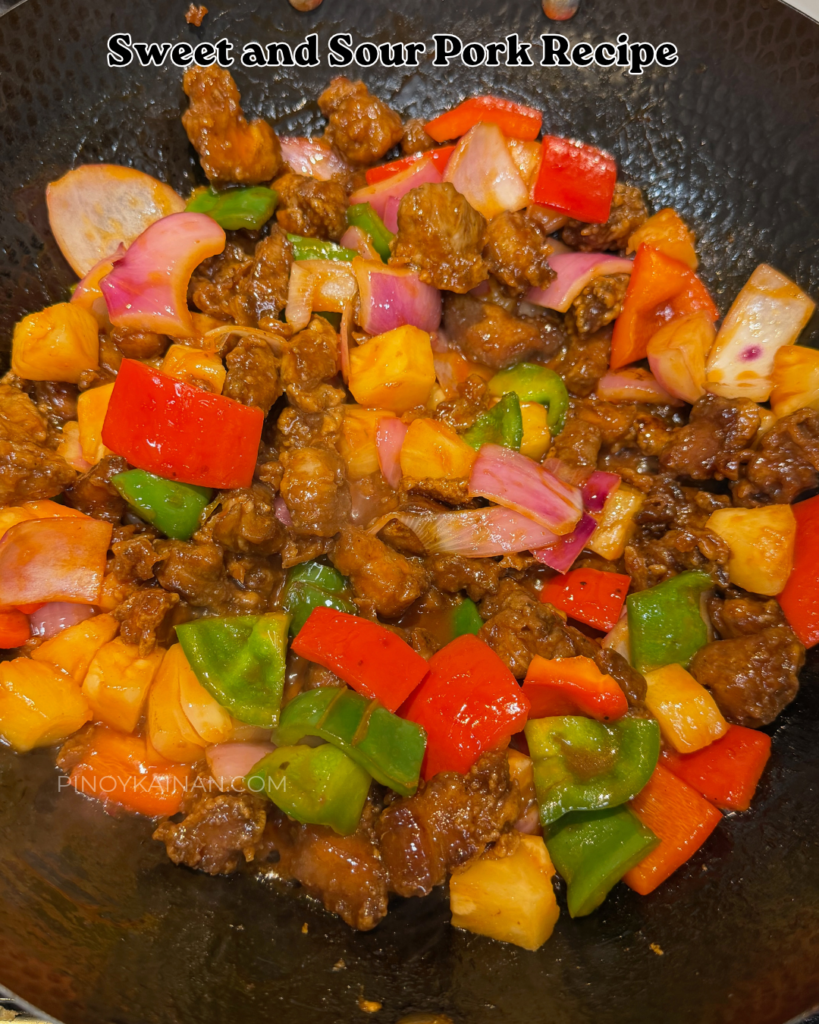

This Crispy Sweet and Sour Pork Recipe combines tender, juicy pork with a beautifully golden, crunchy coating and a flavorful homemade sauce that perfectly balances sweetness and tanginess. Made with pineapple chunks, fresh bell peppers, onions, and a glossy tomato-vinegar sauce, this Filipino-Chinese-inspired dish brings the familiar flavors of restaurant-style sweet and sour pork straight to your kitchen.
Known for its crispy exterior and juicy interior, this sweet and sour pork recipe starts with bite-sized pieces of pork shoulder marinated in soy sauce, seasonings, and egg white. Each piece is coated in cornstarch and fried until golden brown, creating a light, crunchy crust that holds up beautifully when tossed with the sauce.
The homemade sweet and sour sauce combines pineapple juice, apple cider vinegar, ketchup, and sugar for a delicious balance of fruity sweetness and tangy flavor. Fresh bell peppers, onions, and celery add color and crunch, while juicy pineapple chunks make every bite even more satisfying.


The secret to achieving deliciously crispy sweet and sour pork is frying the meat in batches, preparing the sauce separately, and combining everything immediately before serving. This helps preserve the crispy texture while giving each piece a delicious coating of sticky, flavorful sauce.
Perfect for Filipino family dinners, weekend gatherings, special occasions, or homemade takeout nights, this Crispy Sweet and Sour Pork pairs wonderfully with hot steamed jasmine rice. It’s a satisfying pork dish that brings together crispy, sweet, savory, and tangy flavors in one irresistible meal.
✅ Quick Tips: Read the recipe in its entirety before you start cooking. This will help you understand the ingredients, steps, and timing involved, and allow you to prepare any necessary equipment or ingredients beforehand.
Crispy Sweet and Sour Pork Recipe (Filipino-Chinese Style)
Description
This Crispy Sweet and Sour Pork recipe features golden, crunchy pork bites tossed with juicy pineapple, colorful bell peppers, and a rich, glossy sweet and tangy sauce. Inspired by Filipino-Chinese restaurant favorites, this delicious homemade dish is packed with flavor and perfect for family dinners. Serve with hot steamed rice for a satisfying meal everyone will love.
Ingredients
For the Crispy Pork
For the Stir-Fried Vegetables
For the Sweet and Sour Pineapple Sauce
For Serving (Optional)
Instructions
-
Prepare and Marinate the Pork
Cut the pork shoulder into uniform 1-inch (2.5 cm) cubes. Pat the pieces dry with paper towels to remove excess surface moisture.
In a large mixing bowl, combine the pork, soy sauce, salt, sugar, egg white, and finely chopped green onions.
Mix thoroughly until all the pork pieces are evenly coated with the marinade.
Cover the bowl and refrigerate for 1 hour to allow the seasonings to penetrate the meat.
Cooking Tip: Pork shoulder is ideal because it has enough intramuscular fat to stay juicy during frying. Avoid using extremely lean cuts, which can become dry.
-
Prepare the Vegetables
While the pork is marinating, wash and prepare the vegetables.
Remove the seeds from the green bell pepper and cut it into bite-sized squares.
Peel the onion and slice it into thick wedges.
Trim the celery stalks and cut them diagonally into medium pieces.
Keep the vegetables relatively uniform in size so they cook evenly while maintaining their crisp texture.
Cooking Tip: Avoid cutting the vegetables too small. Larger pieces retain more crunch and provide a pleasant contrast to the crispy pork.
-
Prepare the Sweet and Sour Sauce
Open the canned pineapple and set aside the chunks and their juice.
In a medium saucepan, combine the sugar, apple cider vinegar, ketchup, 1 cup water, soy sauce, and salt.
Whisk until the ketchup is evenly distributed.
Add the pineapple chunks and their juice.
Bring the mixture to a gentle boil over medium heat, stirring occasionally to help dissolve the sugar.
Reduce the heat slightly and simmer for approximately 3–5 minutes to allow the flavors to combine.
Cooking Tip: For a tangier, less-sweet sauce, start with ½ cup sugar instead of ¾ cup. Taste before thickening and adjust with additional sugar or vinegar as preferred.
-
Thicken the Sauce Until Glossy
In a small bowl, mix 2 tablespoons cornstarch with ¼ cup cold water.
Whisk until smooth and free of lumps.
While stirring the simmering sweet and sour sauce, gradually pour in the cornstarch slurry.
Continue cooking for approximately 1–2 minutes, stirring constantly, until the sauce becomes thick, smooth, and glossy.
The sauce should be thick enough to coat the back of a spoon without becoming overly stiff.
If too thick, add a tablespoon or two of water. If too thin, simmer a little longer.
Turn the heat to low or set the sauce aside while preparing the remaining ingredients.
Cooking Tip: Always dissolve cornstarch in cold water before adding it to hot sauce. Adding dry cornstarch directly to boiling liquid can create lumps.
-
Stir-Fry the Veggies
Heat 1 tablespoon vegetable oil in a large wok or skillet over medium-high heat.
Add the onion wedges and stir-fry for approximately 1 minute.
Add the green bell pepper and celery.
Continue stir-frying for 3–4 minutes until the vegetables become slightly tender while retaining their crisp texture.
Season lightly with salt and a small pinch of sugar if desired.
Transfer the cooked vegetables to a plate and set aside.
Cooking Tip: Do not overcook the vegetables. They will be combined with the hot sweet and sour sauce later, so they should remain tender-crisp.
-
Coat the Pork with Cornstarch
Remove the marinated pork from the refrigerator.
Place ½ cup cornstarch in a shallow bowl or plate.
Working with a few pieces at a time, allow excess marinade to drip off, then roll each pork cube in the cornstarch until completely coated.
Lightly shake off excess starch to prevent a thick, powdery coating.
Arrange the coated pork in a single layer on a clean plate.
Cooking Tip: Coat the pork shortly before frying. Allowing coated meat to sit too long can cause the cornstarch to absorb moisture and become sticky.
-
Deep-Fry the Pork Until Golden and Crispy
Pour enough vegetable oil into a suitable heavy-bottomed pot for deep-frying, without filling the pot more than one-third full.
Heat the oil to approximately 350–365°F (175–185°C).
Carefully lower a small batch of coated pork into the hot oil.
Fry for approximately 5–7 minutes, turning occasionally, until golden brown and cooked through. The exact time depends on the size of the cubes and oil temperature.
For pork cut from an intact whole-muscle shoulder, ensure the center reaches at least 145°F (63°C), followed by a 3-minute rest.
Transfer the fried pork to a wire rack placed over a tray to drain excess oil.
Repeat with the remaining pork, allowing the oil to return to the correct temperature between batches.
Cooking Tip: Avoid overcrowding the pot because adding too much meat at once lowers the oil temperature and can produce greasy, soggy pork.
-
Double-Fry for Extra Crispiness (Optional)
For an even crispier restaurant-style coating, allow the first batch of cooked pork to rest for at least 3 minutes.
Increase the oil temperature to approximately 375°F (190°C).
Return the pork to the hot oil in small batches and fry for another 45–90 seconds, until the exterior becomes deeply golden and crisp.
Remove immediately and drain on a wire rack.
Cooking Tip: The second frying stage helps remove additional surface moisture, creating a crunchier coating. Monitor the pork carefully to prevent excessive browning.
-
Combine the Pork, Vegetables, and Sauce
Return the sweet and sour pineapple sauce to medium-low heat if it has cooled.
Add the stir-fried bell peppers, onions, and celery to the sauce.
Gently stir until the vegetables are evenly coated and heated through.
Just before serving, add the freshly fried pork.
Toss quickly for approximately 20–30 seconds, just long enough to lightly coat the crispy pork with the glossy sauce.
Avoid prolonged cooking after adding the pork because the coating will soften as it absorbs moisture.
Cooking Tip: For maximum crunch, serve the sauce and vegetables separately and spoon them over the fried pork immediately before eating.
-
Serve Immediately with Steamed Rice
Transfer the Crispy Sweet and Sour Pork to a large serving platter.
Arrange the golden pork pieces with the colorful vegetables and juicy pineapple chunks.
Spoon any remaining sauce over the top or serve it on the side.
Garnish with chopped green onions if desired.
Serve immediately with hot steamed jasmine rice or white rice.
Serving Tip: Crispy sweet and sour pork tastes best fresh from the wok, when the coating is crunchy, the vegetables are tender-crisp, and the pineapple sauce is warm and glossy.
Note
Expert Cooking Tips
1. Choose pork shoulder for the best texture. Pork shoulder contains enough fat to stay juicy during frying. It is generally more forgiving than lean pork loin.
2. Cut the pork into uniform pieces. Evenly sized pork cubes cook at a similar rate and help prevent some pieces from drying out while others remain undercooked.
3. Do not skip the marinade. Soy sauce, egg white, and seasonings help create a flavorful coating and improve the pork's texture.
4. Use cornstarch for a lighter, crispier crust. Cornstarch produces a delicate, crunchy coating that works well with sticky sweet and sour sauce.
5. Monitor the frying temperature. Maintain approximately 350–365°F (175–185°C). Oil that is too cool can make the pork greasy, while excessively hot oil may burn the coating before the center is cooked.
6. Fry the pork in small batches. Overcrowding lowers the oil temperature and reduces crispiness.
7. Double-fry for extra crunch. A short second fry can create an especially crisp exterior. This is optional but useful when aiming for a restaurant-style finish.
8. Use pineapple packed in juice. Pineapple juice adds natural fruity sweetness and acidity. Avoid syrup-packed pineapple if you want more control over the sauce's sweetness.
9. Adjust the sauce before thickening. Taste the sugar, vinegar, ketchup, and pineapple mixture before adding the cornstarch slurry. This allows you to balance the sweet and tangy flavors more easily.
10. Do not overcook the vegetables. The bell pepper, onion, and celery should retain some crunch to contrast with the tender pork.
11. Make the sauce separately. Preparing the sauce before frying allows you to combine the ingredients quickly while the pork is still crisp.
12. Add the pork at the very end. This is one of the most important techniques for maintaining a crispy exterior. Toss briefly and serve immediately.
13. Use a wire rack instead of paper towels. A wire rack allows excess oil and steam to escape, helping prevent the coating from becoming soggy.
14. Serve the sauce on the side for maximum crispiness. When preparing a party platter, keep the crispy pork and sweet and sour sauce separate until guests are ready to eat.
